Saturday, March 31, 2012

Shrimp and Grits Soup, well sort of...Roasted Corn Soup with Shrimp and Mushroom Fricassee, The Soup Diaries!


Corn Soup, Corn Chowder, Cream of Corn Veloute, Crab and Corn Bisque. These are just some of the the soups and soup like dishes created and cooked in American Kitchens celebrating one of our favorite vegetables, Corn!

Corn is a part of the American diet like no other food I can think if. Not only do we start our mornings with it in the form of cold or hot cereals, but we eat it in almost every kind of manner conceivable. Not to mention the High Fructose Corn Syrup thing!

Yes we Americans love our corn. Especially Southern Americans. We eat cornbread and grits and love it. So today I decided to look at creating a Corn soup. For me creating good soup is a mission. I have shared a few of my soup recipes so far and this one is no slouch either.

This recipe is actually a melding of three of my favorite things. Shrimp, Mushrooms and Corn. Growing up I loved creamed corn right out of the can. I mean hello...Cream...Corn....you know me what's not to like! However, as I got older I discovered that this lowly dish gets a bad rap from foodie's and chefs everywhere. It's plebian and pedestrian. It comes out of a CAN! Ok! Ok! I get it. but the concept of cream and corn is not lost on anyone. So using those two things to create a soup seemed like a no brainer to me.

Now there are about as many corn soup recipes out there as there are chefs and home cooks. So I wanted to step up my game a little. I have had roasted corn frozen right out of the freezer at Trader Joe's and loved it. So i decided to use that instead of regular corn. Well again, there are so many roasted corn soup recipes out there from Bobby Flay to some lady from Iowa with an online cooking video blog. Nothing original there! But what about taking that and making it a little more substantial. What about a meal that is a soup but isn't really just a soup???

In catering we often do soups with a garnish in the bowl which is set in front of the guests and then the soup is poured around it. It's a fancy french serving technique which is very visually impressive. So I was planning a friend's birthday dinner at my house and I wanted to get a little fancy. So I thought, why not do a soup as a first course and make it a little special. However, instead of a crouton or a pretty garnish and also instead of putting the protein element into the soup why not make it the garnish and add the soup pureed and silken to it as the flourish. Then let each diner mix and eat as they see fit. Sort of an elegant start.

So I thought about all the things people pair with corn soup. Crab being one of the most common. But I wanted to accomplish 2 things. Make this soup and use some of the items I had on hand. You know frugal when you gotta be!! So Shrimp I had, Mushrooms I had. So it hit me,I could I thought cook them in such a way that they were almost a main course. Sort of a liquid version of Shrimp and Grits! A hearty element if you will. So that the melange of shrimp and mushrooms would also be my in bowl garnish, as well as main substance element, and the corn soup would almost act as the sauce to tie it all together. But to do that the soup would have to really be silken. So I decided not only to cook the soup, but to puree it and then to make it really silken and to have naught but the elemental creamy essence, strain it! ( how did you like the usage of the food "naught", I bet very few food bloggers use that word!)

But Anyway....I had my plan, and this is what I came up with! Enjoy Ya'll!!

Roasted Corn Soup with Shrimp and Mushroom Fricassee
serves 4 


Ingredients:


1 lb bag Roasted Frozen Corn ( I find this at Trader Joe's)
2 tablespoons olive oil
1 white onion diced
2 cloves garlic minced
1 large Shallot diced
1 1/2 cups heavy cream or half and half
3 cups chicken stock
1 teaspoon dried thyme
3 bay leaves ( turkish)
1 teaspoon black pepper
salt to taste

To make the soup part:

Heat oil in the bottom of a heavy pot
add onion and shallot and cook till translucent
add garlic and bloom in the pan
add all other ingredients except salt and bring to a boil
reduce heat to simmer cover and cook for 40 to 45 mins over low heat on simmer
Then turn off heat and let cool down
Puree the soup in batches in a blender till smooth
Add salt to taste
Strain soup through a mesh sieve pushing it through with the back of a spoon to get all te liquid out but leave behind the solids. Discard the solids.
Hold soup in the fridge if preparing ahead of time.
Then gently reheat when ready to use.

For the Mushrooms:

8 oz of shitake Mushrooms stems removed cut into slices
2 tablespoons of butter
pepper and salt

cook the mushrooms till golden brown and season with the salt and liberally with pepper.
about 6 mins over med high heat. Remove from pan and hold

For the Shrimp:

12 shrimp tail on (large) 3 per person more if you want.
1/3 cup shopped chives
3 tablespoons sherry

Add 3 more tablespoons of butter to pan that you used for the mushrooms
Bring to med high and saute shrimp till pink and just done add liberal dose of black pepper and a sprinkle of salt.

When shrimp are pink add the sherry and cook for a minute till reduced then add Mushrooms and chives turn off heat

To serve:

Place three shrimp in the bottom of each of the 4 serving bowls.
Divide the mushrooms and spoon any sauce over them and the shrimp.
Pour soup around them in equal portions garnish with a dollop of sour cream and more chopped chives.



Thursday, March 29, 2012

A WInter Veggie gets Salad Dressed for Dinner

Winter is not a time that is associated with salad. When we think of Summer we think of salads. Live, fresh and vibrant with the energy of the Spring and Summer sun, or blanketed and mellowed by the Falls harvest sunsets. But during winter the only reason we have such bounty around is the world economy and Winter produce from the southern hemisphere.

That may be, but I am obsessed with salads. I love simple old fashioned tossed salads but I what I really enjoy are the more complex and interesting vegetable salads. Green beans, mushrooms, squash. All make interesting and different salads while fresh and in season.  But there are also some veggies that even in the winter make hearty winteresque salad ideas. One of those is Cauliflower. Another is brussel sprouts. Another is kale.

These are the vegetables of the winter months. Leafy greens and solid flowering cabbage family related vegetables. They are also the vegetables that we as Americans have a estranged relationship with. Within the last few years they have been making a come back. New preparations and an interest in healthier eating have motivated food professionals to find new and or interesting ways to prepared and present them to the eating public. Even Food Network personalities are promoting and presenting these vegetables as a foods that we could be preparing and eating.

I have been eating these vegetables all of my life. Often badly. But then I discovered something that changed the way I looked at almost all root vegetables. Roasting. Yes roasting.  

I mean we all know that roasting can do wonderful things to meat. It was not  until a few years ago that I realized what roasting was to so many different foods and more importantly, how that made a difference in the vegetables come out. Or really anything....well almost anything. But I digress.

I wanted to make a salad using cauliflower. Why? Well, the usual reason....I had some and it needed to get used up! That and I mean many of us grew up on broccoli and cauliflower salads that were mayonnaise based and gloppy. Now I love certain mayo based salads but the one I am thinking of I did not really ever care for.  Ew! So I thought why not incorporated roasted cauliflower in with some greens and other goodies and come up with a first course for dinner. I know not original but I  I think I came up with something yummy and not ordinary. See what you think.

Roasted Cauliflower Salad with Arugula and Walnuts and Goat Cheese


1/2 Head of Cauliflower cut into small florets
1 tablespoon honey
3 tablespoons olive oil
salt and pepper to taste

Roast in oven at 325 for 20 to 30 mins or until browned and caramelized remove from the oven a set aside to cool.

1 bag baby Arugula

1 red pepper diced finely
1 small red onion diced finely
2 jalepeneos diced finely
1 cup hot water
1/2 cup apple cider vinegar
4 tablespoons sugar
1/2 teaspoon tumeric powder
1/2 teaspoons garlic powder

Mix all ingredients then let sit at least 2 hours

Balsamic vinegar
olive oil
1/2 teaspoon dijon mustard
1 shallot finely diced

Mix in a small bowl and beat till combined and creamy

1 small log goat cheese

To assemble in a large bowl add cauliflower and arugula and the pepper mixture
plate the salad and drizzle with the dressing. Crumble goat cheese on top. Enjoy!


Wednesday, March 21, 2012

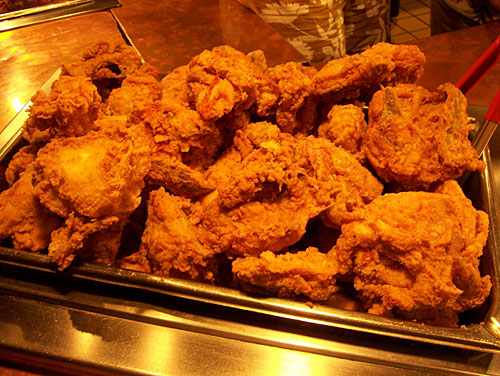
In Search of the Perfect Fried Chicken, Southern Food's Signature Dish


Fried Chicken. The very mention of the words send excited vibes down the culinary spines of many people. I cannot think of a food that people associate more with the South than fried chicken. It's origin may have been the slave kitchens of the southern plantations, with frying being a very African cooking method. But it soon spread throughout all of America's cookery. Made super famous and almost Iconic by the Colonel's famous fried chicken and Southern gentleman image in popular advertising culture, the South's signature dish is well known and loved everywhere.

Here in NYC. people are Fried Chicken Crazy!!! Since I have lived in NYC and the wave of Southern food hit New York city in the last 5 to 10 years, New Yorkers are nut-so for the crunchy crispy goodness that is the chicken ala fried! For example, The Redhead, a very cute and very big player in this southern restaurant wave, has some of the finest fried chicken in the city. The Cardinal, also has excellent chicken, And if you want to talk "New York style" fried, the matzo crumb coated chicken at Blue Ribbon in a Brooklyn Bowling alley is a revelation. Even the one time Tyler Florence inspired menu at the upper scale, comfort food, trashy/classy Cafeteria in Chelsea offers a fried chicken dish worthy of note.

Yes this is the playing field. But what if you don't want to have to go out for chicken. What about doing it yourself? OK there are two things for me about that. Given that I live in a small apartment with lousy ventilation I can't deep fried stove top. Oh believe me I have done it, but the place smells for days afterwards and since I don't own a deep fry machine, which I could, it's just not too great a thing to do. We are talking mess factor here my friends. The other thing is finding a recipe that gives you an amazing result so you don't want or need to go out for fried chicken. In essence like they say on Tyler's Ultimate on the Food Channel, the ultimate recipe for fried chicken.  In fact it has to be so good that you have your friends asking you to make it for them. So they don't have to go out either!!!

So I return to my roots. Well mine and my friend Fred Tessler ( of the Denver Tesslers). One day Fred and I were talking about growing up and how good the fried chicken we had as youngsters was at home. Why? Well it was funny but we both remember the chicken being brown and tasty and yummy with a nice softish crust, much like the colonel's original recipe texture. And we both discovered during the conversation that both our families had used .... an Electric Skillet! Yes, if you were around in the 70's or 80's almost everyone had one. Big Green or Brown and rectangle in shape it sat on the counter and was the source of the best fried chicken we both had ever had at home. The real deal here is that unlike other heating methods and pans the electric skillet has a very even distribution of heat making it better for frying all the chicken at once without having to worry about so-called "hot spots" in a pan. Plus it has a very quick temperature recovery time when you put the chicken into the hot fat.

So that's were I started. I went to JCP. ( J. C. Pennjais!) and looked for the skillet I remembered. Well, they don't make exactly that anymore. But I found one that would do. Sassy and sleek and black with a glass top that had vents in it ( very important). And it was on sale!!! What a deal, thanks Ellen!!

So now I had the hardware. But what about the most important part of the puzzle, the recipe! Well I had tips and tidbits from my Mom, who has not fried chicken in years and years. I also had online research, cookbook research, and I had what my friend Fred remembers from back in the day about his Grandmother's chicken recipe. So that was the start.

The other element in all of this is what to use to fry in. Crisco was recommended. But so was peanut oil and other things. Plus how much oil to use? Since the whole point of this was not to have "super greasy fry fry" all over my apartment I wanted to use as little oil as possible. I took notes from my fryer's guide. 3/4 cup oil. Did not seem too bad. But I decided to up the ante and use my friend Fred's Grandmother's trick, half peanut oil and half margarine!!! Plus I would increase the total amount to 1 cup. Certainly not the 4 cups Tyler Florence used in his fryer recipe.

Next the flavorings and other ingredients. My Mom and Grandmother used spices and flour, cornmeal, salt, eggs and milk. I decided to start there but not finish there. One chef I worked with in catering here in NYC used a brine overnight for the chicken of salt, water and buttermilk into which he added herbs. I decided to do the same but I would add chopped fresh rosemary, dried garlic powder and dried onion powder, and add a little hot sauce. Something I heard about somewhere.

So for the dry spices I picked on advice of my Grandmother, paprika, dried oregano, and seasoning salt. (Season-All). I also decided to add the cornmeal to the dry mix instead of just going with plain flour. To this I added the spices.

After letting the chicken sit in the fridge in it's brine overnight I took it out. and let it sit on a drip tray covered in the fridge for 2 hours. Then I took made the two mixes, one dry, one wet.

Working in batches I dunked the chicken into the wet mix of eggs, buttermilk and salt. Then dredged in the seasoned flour and cornmeal mix.

Again I placed them back on the drip tray and let them sit in the fridge for an hour. Then I removed them and let them come to room temp for about 30 mins. ( You can skip all these steps if you want but I figured I had read that these steps would help to make a better crust because we are not deep frying and we want a nice crust)

I then brought the skillet to temperature with my oil and margarine per the instructions in the booklet to 350 degrees.

Then one by one I added the chicken pieces trying not to crowd the pieces. Then I covered and cooked for 5 mins with the lid on. Checking the chicken to see if it was golden brown I turned it after about 7 mins. Again covered it. cooked about 7 mins again then uncovered it and turned it again. after 5 mins, I turned again and covered. Then I uncovered it turned it again and cooked it for about 10 mins more to crisp it up turning as needed and added a little water to the pan to prevent any burning.

After about 37 mins my chicken was done. I put in on paper towels to soak up some of the grease. Then went on to make the gravy. I added milk and butter to the chicken drippings lots of black pepper and salt to taste. stirring in a slurry of milk and flour to thicken it up.

Plattered the chicken and Viola!! Perfect Fried Chicken at home, and my place didn't have grease marks on all the walls!!! So I know it seems like a lot reading this but it's really quite simple to do. So give it a try at home and see if you don't find you have made the most delicious homemade fried chicken ever!!! Enjoy Ya'll!!

Forrest's Perfect Southern Fried Chicken ( in an Electric Skillet or Frying Pan)


Ingredients and Method:

1 whole chicken cut up into 10 pieces ( breasts cut in half on the bone)
2 cups water
2 cups low fat buttermilk
1 bunch rosemary roughly chopped
2 tablespoons salt
1 tablespoon garlic powder
1 tablespoon onion powder
1 tablespoon hot sauce

Place chicken in container, mix all ingredients and pour over chicken making sure it's covered add water if you must. Let sit in Fridge over night.

When ready to start remove from brine ( discard brine) and place on a dip tray and let sit in the fridge for about another 2 hours.

Remove from fridge

Make wet mix

1 cup buttermilk
2 eggs
1 tablespoon Seasoning salt

Make Dry dredge

1 1/2 cups flour
3 tablespoons cornmeal
1 tablespoon sweet paprika
3 teaspoons dried oregano
2 teaspoons seasoning salt
3 teaspoons ground black pepper

Remove Chicken from the fridge and dip a few pieces of chicken at a time into the wet mixture then dredge in the dry, you can do this in a paper bag shaking the chicken till coated.

Let sit on a tray in the fridge for 30 mins then remove and let sit out to come back to room temp for no more than 30 mins.

Heat 1/2 cup peanut oil and 1/2 cup shortening in an electric skillet. to 350 degrees and the light goes off on the pan

Add chicken slowly and carefully trying not to crowd the chicken. then cover.

cook for 5 to 7 mins checking at 5 mins, if golden turn and cover again

cook for another 5 to seven minutes and repeat process turn and cover then repeat again turn and cover

watch chicken so it does not get to dark.

The uncover and turn down the heat just so light goes out. Cook another 10 mins turning to ensure that nothing burns. If it gets too dark add a little water to prevent burning.

Remove from the skillet and place on paper towels, keep warm in a oven at 200 degrees

To make gravy add 1 cup milk and 4 tablespoons butter to the chicken droppings, mix 1/2 cup milk with 2 tablespoons flours and stir till smooth. Add slowly to the pan and stir in. Add 2 tablespoons black pepper Cook till thickened and bubbly. about 5 mins. Add salt to taste. Serve with warm chicken.
Enjoy!!


Creamy Pesto Parmesan Salad Dressing

Salads need dressings. I mean who wants to eat a salad that doesn't have a good dressing on it. Well maybe someone but certainly not me! Don't get me wrong I love veggies and I love them in various undressed states. But all dressed up in a delicious salad sauce I love them even more.

I have several dressings that I will share on the blog. My french dressing is one I have already shared. This dressing today is something a little bit special. It's inspiration comes from my two places, my childhood and my University days.

When I was about 10 years old Hidden Valley Ranch Dressing hit the market. I can remember the first time I had it. It was at my Uncle Frank and Aunt Martha's house during a family vacation to visit my Big Mama. It was the newest rage amongst the middle class home cooks at the time. for me, it was a revelation in taste. I had always loved creamy dressings but this ranch stuff was something new and special. In fact I love ranch dressing so much that to this day that I will at times still whip up a batch of hidden valley from the packet. It just makes me happy.

So that's one side of the story behind this dressing. The other comes from a restaurant that I worked at in college. Phillip Allen's. Now I have spoken about Phil and how he started his place and how I ended up working there.( see Mushroom soup entry).  I also believe I told you about the wonderful salad dressings he made. His poppyseed dressing was very eighties and VERY good. I am not kidding when I say it's the best I ever have had. And this was the other signature dressing. I of course learned how to make these because I worked in the kitchen as well as waiting on the customers and washing the dishes! But in spite of all the work, it was a great time and a great learning experience. It's where I learned that if you are doing something you love, you rarely feel the compulsion to rush out of work and do something else, because your time is being spent so pleasantly right where you are!

Harrisonburg, Va, where I attended undergrad in the 1980's did not have a lot of restaurants. Or grocery stores for that matter. And my experience with dining out was limited at the time due to having grown up in a family who cooked at home and was always on a budget. So having the opportunity to see what dishes came out of this restaurant's kitchen broadened my perspective on food in general. And I thought I already had a pretty broad one!

I think that's so important for people to have. This broad perspective on food. It's one reason I am glad that American's are so into their food's origin and Cooking as an Art these days. More because of the focus it puts on people's understanding the nutritional value of the food, and the options for what foods are out there more than, the ingredients list of a particular recipe, or the chef's name behind it.

 Let's face it, we have all had Brussels sprouts for example. But whether they were prepared well or not they are still just Brussels sprouts at the end of the day. They are either good a for you food or not. If Daniel makes you Brussels sprouts you'd hope they were good but they are no more or less nutritious than if your Mom made them. But its knowing that they are good for you and CAN be prepared well that makes this shared knowledge of food's value important. Because if your Mom can't cook Brussels sprouts well, you should be able to learn that they can be delicious if made correctly. And you should know that they are good for you. And that is why Food TV., cooking magazines, the foodie movement and even blog's like mine are important. Because they hopefully connect people to good for you foods and tasty ways to prepare them, as well as share the community or family story behind the recipe for them.

So what does all of this have to do with this salad dressing recipe, well nothing really except to say that cooking up a great salad dressing can help get people to eat their veggies and that's as Martha would say...a good thing!

So I give to you the second dressing recipe of this blog. Phillip Allen's Creamy Pesto Parmesan Salad dressing! Enjoy Ya'll.

Creamy Pesto Parmesan Salad Dressing from Phillip Allen's Restaurant

1 cup Mayonaise
1 1/2 cup Buttermilk (low fat variety)
1/2 cup sour cream
2 1/2 tablespoons dried basil
1 tablespoon dried chives
2 teaspoon garlic powder
1 teaspoon salt
1 teaspoon black ground pepper
3/4 cup finely grated parmesan cheese
water for thinning if needed add by the tablespoon

Combine all ingredients in a deep bowl or jar. Using a hand blender blend till smooth. Or do it old school and combine in a container or jar and shake till combined. Let sit over night to enhance the flavors and enjoy on a crunchy green salad with your choice of yummy toppings and croutons!


Sunday, March 18, 2012

Tomato Salad Red, White and Blue!

Now I have talked before about tomatoes and if you have been to dinner at my house or have been to a roof party in the summer you know I am a huge fan of the tomato salad. Not the tomato mozzarella NYC Italian kind of tomato salad mind you, not that there is anything wrong this that. However, I like a more complex tomato salad that actually has a salad dressing and one that has a tangy cheese and one that has some crunch.

Now looking at all the tomato options available to us at the modern farmers market or grocery store can make your head spin. I absolutely love the rise and prevalence of the Heirloom tomato! Heirlooms are nothing more than the strains of seeds which have somehow missed out on the genetic engineering spree in the farming industry in the 50's 60's and 70's and moving forward to today. They are in essence the original tomatoes enjoyed by Americans in a simpler time. They deliver great flavor and color and texture, and in the summer I cannot help but serve them up in a fabulous salad or find a way to enjoy them almost daily. In short they like mashed potatoes would go down on the list as one of my favorite foods.

So tomato salads are about as all American as apple pie. In the summers they grace many a picnic or summer dinner table. And they could not be easier to make. My favorite version can be dressed up or dressed down but no matter how it's presented it's clean simple and tasty. This recipe is for 4 people and is presented on a platter but you could use any type of presentation you'd like. I have made this into an elegant starter for a summer meal as well as served it up all mixed together tossed in a big bowl.


Since it's winter this recipe recommends using Campari tomatoes which are a varietal famous and popular in California cuisine and popular during the Winter months because they are grown in Mexico in abundance during the Winter season. They are  a hybrid type originally from Europe and have exceptional color and are larger than a cherry tomato but smaller than a normal salad or steak type. They are visually a perfect "little" tomato and have great taste and texture as well as flavor. Billed as the "tomato lover's tomato" they are sure to please! Now like I said any tomato will do, but since we eat with our eyes first, Campari Tomatoes give visual impact to the dish. The rest of the ingredients are simple and clean and just yummy. So if you want to try a new salad which is easy breezy cover girl, give this a whirl! Enjoy Ya'll!!

Winter Campari Tomato Salad with Blue Cheese and Walnuts

1 package Campari Tomatoes sliced in half ( allow for three tomatoes per person)
3 oz blue cheese ( I like Maytag it's pricey but REALLY good)
3/4 cup whole walnut halves
10 fresh good looking picked basil leaves
5 fresh basil leaves cut into chiffonade
1/2 cup herb Vinaigrette ( I use dried oregano)

On platter arrange tomatoes
Nestle basil leaves amongst the Tomaotes
Scatter Blue cheese in small chunks over the tomatoes
Scatter walnut halves around the tomatoes
Sprinkle the basil chiffonade around the salad
Spoon on the dressing
Serve!


Thursday, March 15, 2012

St. Patty's Potato Joy... Potatoes Colcannon


I love mashed potatoes. They are probably on the scale of one to ten in the top 9 percentile of the foods I love. I have had them in so many ways I cannot even tell you. My friend John makes them with rosemary and lots of cream cheese. I love them loaded like at Vickery's my favorite bar restaurant in Charleston, and I love them whipped into perfection with lots of butter and cream like at a fine French restaurant.

So it only makes sense that at some point I would talk about mashed potatoes. And since it is St. Patricks Day and everyone in the world is offering up a dish for the holiday I decided to get in the swing and offer up one that might be a little fun.

Now I am supposedly a little Irish on some level, what with my father's family coming from the English and German stock they did. Irish is always in the mix there somewhere I suppose. But whether or not one is Irish or not St. Patricks Day is a fun and rowdy time for all. And a time to enjoy some of the fine dishes that that country has brought to these shores.

It is a little funny to me though, that my introduction to this very Irish dish was through a very American restaurant called the Cherry Creek Grill in Denver, Colorado. Cherry Creek Grill is a member of the Hillstone corporation family of restaurants.Now I don't know how many of you know this, but the Hillstone Corporation is a never ending source of interest for me. Not just because I love to eat there, but also because they have succeeded where many other chain restaurant companies have failed in creating excellent and fresh menus at price points that keep people coming back. They serve food which, as a colleague of mine puts it, is what people want to eat! I was on tour with Cameron MacIntosh's "Oliver" National tour, and we sat down in Denver. A guy I knew in Denver took me to dinner at the Cherry Creek Grill and I had the potatoes colcannon there for the first time. And I have to say they were awesome. Creamy and rich mashed potatoes mixed with sauteed cabbage and onions and lots of butter. Yum!

Now Potatoes Colcannon or "white headed potatoes" as there are known from lore in Ireland are a dish which normally contains potatoes and cabbage and onions and maybe scallions and of course loads of butter! So when I set out from that point I thought about what I do and don't enjoy about the idea of cooked cabbage. I think maybe it's from having too much boiled cabbage growing up but I sort of don't fancy it. However, I am intrigued by how the two elements of mashed potato and the cooked cabbage made such a great dish when I first tried it at that Hillstone restaurant. However I knew after all this time and the foodie things I have experienced that if I were to make them, I could up the anty.

My thought processes about this made me think about two things. I have read that colcannon can be made with Kale. I like Kale. So I thought why not work with that. The second thing I thought about was that I like green foods. So if I were to make colcannon I would like it to be a little more green than the version I had at Cherry Creek Grill. Now I have expressed before in the blog my love of colored foods. Foods that take on a different color shade due to some emulsion of another food or addition of herbs etc. are so great to me. Great to me from a taste standpoint first, but also from a composition standpoint when talking about putting foods together on a plate. So I wanted to make a greener spicey and more flavorful version of the dish I loved so much when I had it the first time, whew...not a short order!! Cause why.....Hillstone rocks but here it goes!!

My first inclination was to take example from one of the Chefs at work who created gorgeous green basil ( not pesto ) whipped potatoes a couple of years back for the Spring menu that year. He told me the trick was to blanche the basil so that even when it was added to the warm potatoes it would retain it's green color and not turn a pasty brown. An old culinary trick but an effective one. Next I thought about my ingredient list. I already had the Kale, but why stop there. So I added for the onion more green power, leeks and scallions. And for a bit of a kick a bit of garlic for even more added fun. For the consistency I decided that buttermilk would do a better job and flavor than just cream and of course lots of butter.

To insure the dish had both color and texture I decided that blanching the greens quickly then pureeing them with some buttermilk and butter would be the emulsion that would color and flavor my colcannon nicely. Then for some texture a few reserved scallions for garnish as well as a big "knob" of butter to finish off the dish. Sounds yummy. You bet! So enjoy trying this and Happy St Patty's Day.

Potatoes Colcannon with Leeks and Kale

Ingredients
4 or 5 good sized Yukon gold or golden yellow potatoes scrubbed and diced into pieces
handful of salt
2 leeks cleaned light green and white parts only
2 cups chopped kale packed tightly
1 large bunch scallions thinly sliced on the bias 1/2 cup reserved for garnish
1 cup buttermilk
1/4 cup sour cream
1 stick butter cut up
1 tablespoon minced garlic
salt and pepper to taste

Method

Place potatoes in a heavy bottomed pot with salt and bring to a boil
Cook till potatoes are easily pierced with a fork
Then remove from heat and hold warm.
Meanwhile bring another pot of water to a boil
Prepare an ice bath in a large bowl.
Add kale and leeks and blanche quickly until the kale turns bright green then remove from the boiling water  about 4 to 5 mins and place into an ice bath in a large bowl to stop the cooking.
Drain on paper towels and set aside.
Place greens into a blender with the scallions and blend with 1/4 cup buttermilk and 1/4 stick of room temperature butter
Blend until pureed and still a little chunky (ie. not thin think texture).
Open potato pot lid and add the emulsion mashing the potatoes until mashed add sour cream and 1/4 stick butter salt and pepper to taste and the garlic.
Mash and stir till well combined. If not loose enough add the buttermilk a little bit at a time till you have the consistency of whipped mashed potatoes.

To serve place the potatoes in a large serving bowl and garnish with the remaining butter and scallions or serve in small bowls and place a knob of butter in each and garnish with the scallions.

Enjoy!!


Wednesday, March 7, 2012

I Love a Casserole Style Enchilada Swiss Style!!

So last Saturday night two friends came over and brought with them the fixings for Margaritas! So I accommodated them by making my Guacamole and my Spinach and Mushroom Enchiladas. They were very happy and we all found it a fair trade!

Now some people have looked at my winter white enchilada post and have let me know that they think they are really good. In fact I have had at least two people I know of make them and with great success. That recipe came originally from a boy in the cast of one of the shows I did in Wisconsin. It was when I discovered that American casserole style enchiladas are really what I love. So although I have a red sauce version on this recipe it's a mix sauce of green and red that I will offer up here today.

Enchiladas fall into 3 categories and people fall into three camps about them. First camp is red or green. Or is your sauce base red or green chilli?  The second camp is corn or flour or what type of tortillas do you use. The last is do you include dairy additions beyond the shredded cheese or none at all. Now I have made and had all of these different types. I tend to go for a red enchilda with maybe a suiza or "swiss" style when I eat out at a restaurant. Mostly thats because I find that alot of enchiladas in restaurants are too dry and the "swiss" or "Suiza" element helps with that. Oh, "Suiza" means that there is a sour cream sauce in and over the taco in addition to the red sauce base. You know I'd like that!

So my enchilada making experience began in the kitchen of our house in Reston, Virginia when my father's job took us north for a few years. Old El Paso had just come out in the grocery stores in force nationally and my Mom decided to give making Mexican at home a try. We often ate in the kitchen around the breakfast table on Friday nights. It was a close and fun night where the foods were likely to be some form of ethnic food ( our attempt at branching out) and the conversation ran the gamut of whatever was happening in our worlds. Since money was tight sometimes growing up ( navy Family) my Mother and Grandmother would find foods that would be entertaining as well as tasty and filling. My brother and I had taken quite a liking to mexican foods and they began looking at ways to make them at home. We started with tacos and continued with tostadas and burritos but the real challenge was to make really good enchiladas at home. I would help my Grandmother as she poured over cooking volumes she had and together we would create from scratch sauces and combinations that were really original or our take on something "Mexican". Or we would buy a lot of cans of sauces and refried beans and start our meal from there. Tacos sprung to life served up with beans and spanish rice. And the repertoire grew from there. Mostly these were beef or chicken dishes sauced and cheesy  and while they were really good they mostly provided a lot of fun in both the making and the eating departments.

As my culinary horizons widened over time I became aware that while ground beef and chicken was fun, there were other even dare I say, veggie options, that could satisfy even the most hard core beefy meaty cheesy savory seeker! So overtime I developed a recipe for enchiladas that brought in major savory action but left out the beef. Believe me these are so "meaty" the way they come out you won't miss the meat. It was in the time before my "Wisconsin Awakening" to white creamy enchiladas but that came into the mix as well making this recipe super rich and really yummy! And they could not be easier. You just need a food processor a baking pan and some patience! So without more explaining, I give you:


Spinach and Mushroom Enchiladas in a Swiss Style Chili Sauce


Ingredients:

1 package Flour Tortillas ( 12 count)
1 box frozen spinach thawed and drained
2 medium onions
1 10 oz carton white button or baby bella mushrooms
1 cup ricotta cheese
1/2 cup sour cream ( plus extra for garnish)
1 cup jack cheese grated
1 tablespoon minced jar garlic
3 tablespoon cumin powder
1 tablespoon chili powder
2 teaspoons Kosher salt
2 teaspoons pepper
2 cans mild green chilies
1 tablespoon diced pickled jalapeno peppers
2 cups of half and half
2 cans red enchilada sauce
1 small can sliced black California olives
1 cup yellow cheddar cheese grated
1/2 cup sliced scallions ( plus extra for garnish)

Method:

Run the mushrooms and onion through the food processor separately dice the onions till diced and the mushrooms till they are cut up into a dice about the size of corn kernels or slightly smaller. ( the idea here is that when cooked the mushrooms will take on a ground beef texture )

In a pan with a few spoons of oil place mushrooms and onions saute till a little soft and brown but not too much as they will cook more in the oven. Turn off heat.

Add ricotta, spinach, jack cheese, spices and green chilies and peppers and mix gently together.

Combine the half and half with Red sauce

Pour 1/4 of the sauce into the bottom of a baking dish

Warm the Tortillas in a microwave to make them bendable

Fill each with 2 to 3 tablespoons of the mix till full but still rollable

Place them tightly into the baking dish in a row the last two may have to be tucked on the side

Pour the remaining sauce over the top and let fill in the pan

Top with cheddar black olives and scallions

Bake in a 350 degree oven for 30 to 40 mins till top is starting to brown nicely.

Serve and enjoy with extra sour cream and scallions for garnish


Sunday, March 4, 2012

Biscuit Bowl Voodoo and Salt and Pepper Cream Biscuits

So southerners are in love with their bread products. From Cornbread to soft wheat dinner rolls, to sweet breads and cakes and of course, biscuits. Biscuits conjure up thoughts of fat flaky rounds of baked browned goodness rising slowly in a hot oven and resting in buttery goodness when finished off. I can remember my Big Mama making cornbread for her Mid-day meal and sometimes making biscuits from scratch. Either was a treat and both were delicious.

I think everyone in the south who makes biscuits either has a recipe that they have inherited and was handed down through the family or has by trial an error arrived at what they consider to be biscuit epiphany. Others have in addition to their chemical recipe a physical manifestation of their biscuit heritage in the form of cooking tools much like my friend's freind Carter, who has his grandmother's wooden biscuit bowl. Now a biscuit bowl is a real true element of biscuit making in the south for many. The bowl in which the biscuits were mixed was almost as important as the recipe and the ingredients themselves. By lore a biscuit bowl is a bowl that is never cleaned out or emptied completely. It is stored in a cupboard and usually has a cloth or towel that sits over it until the next time it is used. It is an old tradition and people swear to the production of their treasured recipes being enhanced by the magic of their biscuit bowl. The "magic" if you will is the leaving of the residual flour for use the next time. Thus creating the illusion of the never ending well of biscuits. It was a practical thing back in the day but has become a treasured source of biscuit lore in the family that possesses the bowl of cooking heritage.

Now I do not possess a treasured biscuit recipe from way back nor a magic bowl. I do however love to make biscuits and my favorite recipe for them which is also incredibly easy is my recipe for cream biscuits. My first encounter with the cream biscuit was when I was working for Peter Callahan a caterer in NYC. He only served biscuits with his dinners never bread and they would arrive cut square and deliciously decadent at the events. I always would try to grab at least two they were so tasty. I finally asked the chef for the recipe and she told me they were very simple. They contained three things Flour, crisco, and heavy cream. I thought that was pretty easy. But recently my cousin gave me a recipe for cream biscuits that was even easier and they came out so lovely. I make these now and I love them. So for the biscuit lover in you I give you this recipe. It's foolproof and easy so give it a try. Enjoy ya'll!!

Forrest's Easy Peasy Salt and Pepper Cream Biscuits


Ingredients:
2 cups Self rising or cake flour
2 cups heavy cream
2 teaspoons salt kosher
Fluer de Sel ( coarse French sea salt)
Pepper grinder
3 tablespoons melted butter

Method:


Place flour in a bowl make a well in the center of the flour
Add salt
Add 1 cup cream slowly into the well mixing as you go.
Keep adding cream ( you may not need all of it) until the mixture has come together and sticks to itself more than to you!
On a floured board knead the dough until it's together
Then roll out and cut with a cutter into rounds pushing the residual dough together until you are done.
Place on a greased baking sheet
Sprinkle top with fluer de sel and cracked black pepper
bake in a 450 degree oven for 8 to 10 mins or until done
When done remove from oven and brush with the melted butter

Enjoy

Tuesday, February 28, 2012

Hiki Tiki Glamour Porch or Korean BBQ Pizza... Holy Kimchi Batman!

Two summers ago we held an On the Plate event which sadly proved to be our last. We wanted to do something for summer and we wanted it to be fun and different. So I came up with the idea of doing a polynesian evening. A luau of sorts. At first I don't thing Stuart my partner was into the idea. But with a little creative collaborating and me calling it "the Hiki Tiki Glamour Porch" he was in and we set about planning the evening. He got so into the idea that before I knew it he had a hula troupe coming to perform at the party. I mean fun right!!

For the party we served cocktails. Mai Tai's and Hawaiian Punch that packed a punch! And the food we decided should be cocktail party food, nothing too heavy, nothing needing plates. We settled on a number of dishes which we decided to bill as "Pacific Rim Tapas".

Asparagus and Mushroom Wontons with Soy Aioli
Bacon Wrapped Baked Bananas with chili Sauce
Korean BBQ Beef Pizza with Cool and Spicy Kimchi Topping
Dan Dan Noodles in a chinese box
Ham Bacon and Pinnapple Quesadillas with Sour Creme
Spicy Crunchy Sesame Peanut Chicken Salad in a chinese box

So that was the total menu. And I have to say the food all came out really well. Everyone enjoyed it and they ate heaps of it. I was a little proud of the fact that I was able to translate some very western foods into something that the group seemed ultimately to enjoy. I mean we wanted it cheeky, not authentic, with a nod to the east and the pacific but fully western and a cocktail menu. I think I did OK.

So for those of you all who have asked in the past year for this recipe I will now give it up. It's really simple and easy and makes a really nice change from the normal pizza dinner especially if you have people in the house who are meat eaters. I will warn you it may change your mind about what belongs on Pizza, but isn't that what reading these things is about! Enjoy Ya'll


Korean BBQ Pizza with Spicy Creamy Kimchi Topping


Ingredients:


1 pizza crust round or rectangle ( I like rectangle)
1 lb short ribs ( cut up into strips)
1/2 cup dark soy sauce
1/4/ cup dark rice wine ( or sherry)
1/4 cup pineapple juice
1 tablespoon ground ginger
1 tablespoon minced garlic
1 tablespoon toasted sesame oil
1 pinch chili flakes
1 teaspoon pepper
1 cup Korean pizza sauce ( 1/4 cup canned pizza sauce and 1/2 cup thai chili sauce ( mild) )
1/2 cup red onions sliced into fine half moon ribbons
1 cup cheddar cheese

For Korean Beef
Place Short RIbs slices and next 8 ingredients into a plastic bag and shake well till all combined
Place in fridge and marinate overnight
Remove from fridge and bring to room temperature.
Cook in large skillet in 2 batches till mest is done and browned and tender
Cool and reserve


For Kimchi ( My quick recipe)

3 cups shredded green cabbage
5 scallions sliced on the bias
2 tablespoons black sesame seeds
1 tablespoon Sriracha  Hot sauce
1/2 red bell pepper cut into small ribbons
1/2 red onion sliced into small dice
3 tablespoons finely chopped cilantro
1 tablespoon Mayonaise
1/4 cup rice wine vinegar

Combine all ingredients and let sit in the fridge for at least 2 hours.

For Pizza

Spread out dough on a greased baking sheet
Spread with sauce
Add Korean beef
Red onion and cheese
Bake in a 375 degree oven for 20 to 30 mins till crust is brown
Remove from oven let cool for 5 mins
Top with Kimchi and serve sliced immediately

ENJOY!!


Saturday, February 25, 2012

One toast Soldier rides away..Smoked Salmon Tartare, Pickled Fennel salad, Horseradish and Toast Soldiers

One of the things that being a "Son of Norway" on one side of the family gives you is an appreciation for a number of things. One is Christmas traditions and traditional sweets . One is late night suppers with warming soups and open faced sandwiches. And one is sardines and other smoked fish and fish products. I mean I could throw Aquavit in there too but really my love for beer is more cultivated than my love for the liquor of the Motherland.

Norway is a little known country in the US. unless you are in certain parts of the Midwest. It's foods and it's traditions are blurred together with the more well known and vocal neighbor Sweden ( I mean who can compete with Abba and Ikea as icons). Even it's meatballs aren't as well known as it's neighbor's although different and very tasty. ( More on that in another blog). But Norway had a big impact on this nation and it's people contributed mightily to many regions of the US. not just the Midwest. For example, did you know that after the turn of the century and before WWII Mobile Alabama had a large Norwegian population that was involved in the ship building industry there. Or did you know that in the early part of the last century there were more Norwegians in Brooklyn than Germans, or actually in Norway itself for that matter. Gone are there communities for the most part although to this day in a part of brooklyn there is a small smattering of Norwegian shops, churches and stores. But only the very old remember any real community or sense of tradition being there. That's the odd thing about transitions in the US. Whole groups of peoples have come and gone from areas and left nary a trace.

My mother's family on her father's side all came over on the boat. She is on that side of the family the first generation American. Not so on her Mother's side. But because of this European connection I have  relatives who grew into being Americans. They all learned English as a badge of honor, not wanting to be separated from the people that they were living amongst. Immigrants then learned english. In fact it was somewhat of a duty. It wasn't easy, lets face it English is actually a complex tongue compared to many. So many ways to say the same thing. My Great Grandfather used to say in frustration " I just learned how to say JELLY, when they changed the word to "Y"am! " The J being pronounced like a Y in Norwegian made this a riot! Ah, those simple times!

Being half Norwegian my Mother learned all about the traditions of the Norse peoples. From the Christmas traditions to the stories of the homeland her relatives shared things, and of course they shared the foods. Most of what came down to my brother and myself were Christmas sweets and cakes, and an appreciation for certain spices in savory dishes like Nutmeg and Allspice. We also got a fair dose of smoked seafood and fish. And a love for dark brown and rye breads with certain meals. All in all not a bad dose of culinary knowledge.

Today's recipe is something that I picked up over my time working in the NYC restaurant and catering scene. It is a dish which embodies a few elements which I have found fit into the flavor palate that I grew up with at home with Norway in the background of the cooking that the women of the house were doing. Which may explain why I took to it! It also is an easy dish that looks and tastes so elegant that it's sure to be a crowd pleaser. And unless people have an aversion to fish in general it's also a great way to make a tartare that it not really raw. Don't get me wrong I love a good steak tartare or a fresh tuna tartare. But there are those folks you might have over who have a problem with eating raw meat or seafood. This is a bridge between the two worlds and boy is it a tasty one. So grab your ring mold and your mandoline and lets get cooking!

Smoked Salmon Tartare with Cucumbers and Pickled Fennel   (serves 4 as an appetizer)

Special equipment you will need:

A 2 inch metal or plastic restaurant mold

A mandoline ( slicer, you can use a knife and do this by hand but it's so much easier to cut paper thin slices on a mandoline)

Ingredients:

10oz smoked Salmon ( I like to use Gravlaks or Pastrami smoked salmon when available it has such great flavor)
2 tablespoons capers
3 tablespoons finely diced red onion
1 1/2 tablespoons fresh dill chopped plus more for garnish
1 tablespoon dijon
dash of worcestershire sauce
dash of tabasco
pepper to taste
1/2 teaspoon prepared horseradish
2 tablespoons sour cream
1/2 tablespoon lemon zest
2 persian cucumbers sliced thin on a mandoline into rounds
1 small head of fennel sliced paper thin on a mandoline
white vinegar
2 tablespoon sugar
2 tablespoons salt
2 tablespoons both mustard seeds and dried coriander seeds whole
lemon juice

Method

Place the fennel in a bowl pour the vinegar over it to cover, then all the next 3 ingredients. stir well. Cover with plastic wrap and leave in the fridge overnight

Next finely chop the salmon into fine dice
Mix all the rest of the ingredients together gently
except the cucumbers
Cover and let sit in the fridge for an hour

When ready to serve

Place ring mold in the middle of the plate and fill with the tartare
place a ring of overlapping cucumbers around the ring. Pour a little lemon juice on the cucumbers.
Take the fennel out of the fridge and taking a few strands top the tartare with a little nest of the fennel, make it artistic and twisted. Not too much just to give it some drama. Then garnish with the dill frons. Serve with white toast soldiers. Which are white bread toasted crusts cut off and then cut into toast "fingers".
And there you have it a very classy appetizer that it also really easy to prepare. Enjoy Ya'll!


Wednesday, February 22, 2012

Truffled Mushroom and Asparagus Panzanella ( from On the Plate )

So every year for the past 5 years in the summer I have thrown a roof party. This involves a BBQ and a buffet dinner as well as copious amounts of fun and drink.

It is really a blast to do, and I have gone fancy, and I have gone simple. But whatever I do I try to do at least one thing that is new and different and no one has had me cook before. It's a chance to put out a new recipe that I think will be good and get the feedback from the people attending.

In the past few years I have become a big fan of the Panzanella salad. Panzanella for those of you who do not know is a traditional Italian Bread Salad. Made with day old bread and tomatoes some basil and good olive oil and some vinegar. Maybe some cheese is thrown in but it's a simple salad and quite an ingenious way to use up day old or slightly stale bread.

My first real encounter with the versatility of this salad came in the catering world about 10 years ago. I was working for a very forward thinking catering chef and he threw a ton of veggies and a savory dressing into the bread salad and called it a Market Panzanella. There were a variety of versions of this salad over the years that I saw at work or in cookbooks including one of my favorite versions, the Greek Panzanella. I make a mean Greek Panzanella, as my Mother and her friends will tell you, because she has used my recipe to many accolades from the Ladies of Mt Pleasant!  But without a doubt no matter how many versions of this salad I have made none of them were as popular as this version which I served at the BBQ party last year.

You see I really don't believe that there are that many new things under the sun, however, sometimes something comes along and reminds us in a new fresh manner why we liked something to begin with so much. So it is with recipes. Nowadays it's all in the twist. The fresh approach. Or the combination of something with something else. That's where this salad came from. Well that and necessity!

By necessity I mean that  I had planned on a certain number coming for dinner to the BBQ.  In and amongst the items I had chosen for the buffet to go with the BBQ food was a mushroom and asparagus salad. However, when more people decided to let me know that they were going to come I could not increase the amount of salad ingredients I had already purchased but I could figure out a way to stretch it! And that way was bread. You see that's why I love Panzanella for a big party. BREAD IS CHEAP. You can make a big bowl of it and as long as you have the bread dressed well and slightly moist from the dressing but still with some crunch, you got a taste sensation people will love. They forget what else is in there! Well not really but it just sort of all goes so well together.

In this case I had had a salad in mind that was rich and decadent. It was a mushroom and asparagus salad with Arugula and onion in a lemon truffle salad dressing. Simple, fresh and very deep and savory. Normally one would think of it was a Fall or Winter salad but in this case adding other elements made me feel like it could be a summer salad winner. The problem was I had purchased what I needed to make the salad for a certain number of guests. now I was facing twice as many coming. So I thought what if I tweaked this just enough to come up with a volume I needed but retained the excellent taste I wanted to offer. This idea worked.

The original salad relies on the Umami of the ingredients. Umami is the Japanese idea that a taste or profile of tastes make up another sense in terms of physically enjoying food. It's the seventh sense. There are lots of foods that have umami, but this salad was full of them. It's a recipe I have derived from a salad that Jean Georges made in Food and Wine magazine several years ago, and has been a favorite of mine ever since. But the idea of turning it into a panzanella was a little fun.

So armed with the original salad ingredients and some added cherry tomatoes for color, I assembled the Panazanella. It really beautiful. Green, earthy, red, purple and soft crusty white bread with tinges of yellow from the lemon zest. And it tasted really really good. It was gone in no time. A testament to it's goodness. I know that it made an impression because a food critic from a local rag mentioned it in his column about where and what he ate during that weekend. It was "perfect for summer"! Well I think it can actually be perfect almost every time of the year. But you be the judge of that. Give it a try and see if you don't just like it! Enjoy Ya'll!

Forrest's Truffled Mushroom and Asparagus Panzanella
(makes 10 to 12 portions as part of a buffet dinner)


Ingredients


1 large bunch fresh green asparagus
1 large bunch fresh white asparagus
4 tablespoon oilve oil
2 pounds baby bella mushrooms
1 teaspoon dried thyme
1 package dried morel mushrooms
1/2 package baby Arugula ( more if you want to stretch the salad)
1 large sour dough country bread loaf cut or ripped for texture into 1 inch cubes including crust
About 5 to 6 cups
1 large red onion sliced into ribbons
1 small pint cherry tomatoes sliced into halves ( 1/4 cup reserved for garnish)
2 tablespoons lemon zest
1 bunch scallions chopped ( 1/4 cup reserved for garnish)
1 cup sliced almonds
Olive oil and Balsamic Vinegar for final dressing
Sea salt to taste

For Dressing

1 1/2 cup good quality olive oil
1/2 cup red wine vinegar
1/4 cup lemon juice
1/4 cup truffle oil
2 tablespoon minced jarred garlic
1 tablespoon dried parsley
2 tablespoon dijon mustard
1 teaspoon salt
1 teaspoon pepper

Method


Trim asparagus so fiberous ends are gone.
Cut asparagus up into 2 inch ribbons
Place in microwave proof bowl and cook for 4 mins. on high.
Check to see if done but not overly soft, if they need more then cook more in 1 min increments till done
Cool.
Place oil in a skillet and heat. When hot, add mushrooms and saute till done and liquid is absorbed. Add dried thyme and add the morels* ( see below) . Cook for about another 3 mins
Remove from pan and cool.
 *(Place Morels in hot water and let soften. When done drain and cut morels in half longwise 
and add as in above.)
Place Bread cubes on baking sheets in one layer. Heat oven to 325.
Place bread in oven and toast for 15 to 20 mins
remove and cool.
When ready to serve, place all ingredients into a large salad bowl.
Slowly add half the dressing mixing slowly with your clean hands.
Continue to add dressing till salad is nicely coated.
You should use all the dressing but do it to taste
If salad is still to dry add more olive oil and Balsamic vinegar till moist.
Garnish with the reserved scallions and cherry tomatoes and serve.

For dressing

In a blender add all ingredients except the 2 oils
With blender going add slowly both oils till incorporated and smooth.


Monday, February 20, 2012

Shrimp and Grits the Charleston Signature Dish

I have to say that the most requested thing that people ask me to cook for them in New York City is Shrimp and Grits. It is funny to me in a way. I don't mean funny "HA HA", but funny strange.! It is strange to me that New Yorkers seem to have a love affair and a fascination with Shrimp and Grits in such a major way. I mean I get the fascination with all things southern and even the evil grin that comes from talking about Paula Dean. But truly aside from fried chicken I can not think of a food item that is more iconic to Yankees up here than Shrimp and Grits. Ok that being said, there are not that many restaurants in NYC that even serve it. The Redhead in the east village does a nice job, but the portion is so small compared to what I am used to in Charleston  and is a little bit of a put off.  I would have to say in fact that, in New York I have yet to have really good Shrimp and Grits in a restaurant, unless you count the ones I had at Dizzy's Club Coca Cola after I gave the Chef my recipe. (Which by the way I hear has been changed since. But at least my recipe was on a New York city menu for a hot second!) Thank you Marc and Tim!

No offense Redhead but for all ya'll in NYC in particular, you should just learn to make this dish at home. It's not hard. And that's exactly where the dish came from. It is a low country shrimpers breakfast. It use to consist of basically shrimp cooked in a butter sauce and placed on top of a bowl full of grits. Very simple, clean, tasty. It was the breakfast that the shrimper's would have when they set out in the mornings for the day. This culinary tradition is carried on today the the Wreck Restaurant on Shem Creek in Mt. Pleasant SC. serving up down home breakfasts including Breakfast Shrimp and grits. So as this dish evolved it has come to include all sorts of other ingredients like pork fat products and other savory add in ingredients. But that original version which is so simple, is still very good.

My version of Shrimp and Grits comes from a variety of places. My Grandmother and Mother have made this dish based on a recipe from the "Charleston Receipts", a cookbook of Charlestonian cookery which was first published in 1930. It's subsequent versions still include the recipe for "Breakfast Shrimp and Hominy" the name in the original 30's version or Breakfast Shrimp and Grits in the 1976 revision. My version also calls upon my experiences in dining out in Charleston over the years and having tried a variety of different chefs take on the dish. Everytime I go home I have to have this dish at least one time while I am home. It's sort of a tradition with me.

There are just about as many Shrimp and Grits recipes out there are there are cooks. I think that's the beautiful thing about this dish. You start somewhere and before you know it you have developed your own unique version of this dish.  And that's the joy of cooking at home, you are the chef, you call the shots! So that being said for me the taste of this dish is all in the sauce. It's the glue. And there are two primary ingredients my Grandmother and Mother used to make this dish that gives it the flavor from the old school recipes. One is Seafood seasoning, that's right Old Bay. The other is Ketchup. Yes Ketchup. All the flavors that it has already make it willing and easy base for the rest of the sauce. A little strange perhaps but such are the secrets of home cooks. They also make it easier than making shrimp stock and adding all sorts of herbs. Not that that is bad but why when this base sauce is so easy and so good.

So here in the thick of Martis Gras I give you this celebration of the southern table. Give it a try at home, and tinker with it after you have made it per recipe the first time. Make it yours and people will be asking for you to make it again and again. Enjoy Ya'll!

Forrest's Famous Shrimp, Sausage and Smokey Grits ( 4 servings)

Grits

3 cups of whole milk
1 cup chicken stock
1 1/4 cup stone ground Grits ( don't use instant)
1 tablespoon salt
2 teaspoons pepper
1 1/2 cups shredded smoked gouda and white cheddar cheese mixed half and half
4 tablespoons butter

Bring liquids to a boil add salt
Add grits slowly using a whisk to stir in making sure that they do not clump
Reduce heat to simmer
Stir till it starts to thicken a bit.
Cook 20 to 25 mins or per package instructions
When done add butter, pepper and cheese stir till melted and mixed well.
Hold Warm.

Shrimp and Sausage Sauce

1 lb wild caught shrimp, peeled and deveined
1/2 pound Andouille sausage cut up in small pieces
3 strips smoked uncured bacon ( not apple smoked)
1/2 green bell pepper finely diced
1/2 red pepper finely diced
1/2 onion finely diced
1/4 cup finely diced up celery
1 teaspoon finely minced or jarred garlic
1 tablespoon Old bay Seasoning
2 good dashes of Worcestershire Sauce
2 tablespoons lemon juice
1/2 cup Ketchup
1/4 cup of Water to thin sauce
2 Tablespoon heavy cream
dash or two of tabasco
salt and pepper to taste
4 tablespoons chopped parsley
4 green onions chopped ( held in reserved for garnish)

Method

In a heavy skillet cook bacon, remove and reserve grease in the pan add 1 tablespoon butter.
Add Shrimp and 1 sprinkle with 1/2 tablespoon of the Old Bay, cook 2 to 3 mins till done remove from the pan hold on the side.
Add sausage  and the bacon and brown then add all vegetables.
Saute till soft but not overly brown about 5 to 7 mins.
Add rest of Old Bay and W sauce and garlic and Ketchup and hot sauce. Cook till incorporated.
Add  lemon juice  and the cream and about 3 tablespoons of the water.
Add shrimp and warm through.
Add parsley. if sauce is too thick add water a tablespoon at a time to thin.

To serve

Divide the grits between 4 bowls ( flat bottomed pasta bowls work well)
Top with the Shrimp in a circle
Then spoon sauce over the shrimp and grits filling in the spaces between in the shrimp.
Garnish with the green onions.
See wasn't that easy!
Pretty and tastes good too!!
Enjoy!


Saturday, February 18, 2012

We're Fish House Fancy Now! Old School Florida Fish Dish


My earliest memories of Florida are standing on the seawall of the beach at St. Augustine or Jacksonville Beach with my Mother and Grandmother. I was one years old but I  can still remember the roar of the waves and the cool blue gray colors. We lived right there and went often on walks to the beach. The ocean has long been a part of my conciousness and a big part of life. I lived near or at the shore for the first 11 years of my life. Sun and sand and water and sky were all a part of my everyday.

After we moved to Washington for my father's business we took our first trip to the beach one year after arriving there. My Mom drove us out to the Delaware coast to Bethany Beach and to a church camp retreat with our church group for a week. When we arrived both my brother and I were so excited to go and see the beach. We collected our towels and things put on our bathing suits and walked the 2 blocks from the Camp to the beach. When we got there we were dumbfounded. My brother burst into tears stating " This is not the beach" having been accustomed to the beauty of Hawaii and Floridian and Carolinian beaches all his life. I too was so upset. The gray Atlantic with the muddled brown sand and the dark grey of the evening sky did not make it the dream we had waited for and we hadcome to know and love beaches far different from this one. Of course with the rise of the next days sun and a few trips into the water from the shore we were happy to be at the beach again, in any form.

The other part of living near the shore growing up was the presence of seafood. We would cook it at home. But when I was little and living in Florida often those dinners were not as memorable as the ones had occasionally at the Floridian Fish houses or Spanish Restaurants we would go to. Later back in Charleston I really came to enjoy the Southern style Fish House and the foods offered there.

 Eating out when I was growing up was a treat not the norm. That was actually true for most of the US. Until the 1980's there was by no means the number or variety of dining options we have now in the US. Many cannot remember a time when we didn't just go out if we did not want to cook. That wasn't always so easy. It meant negotiating crowded places with lines or no tables at all because you had to have a reservation to get a table. The dining out trend grew in the 1970's but only in the larger cities. However, there was one area that had a plethora or options for dining out and that was vacation spots. And lets face it Florida became the vacation darling of the US in the 60's and 70's. So there were lots of places to eat. And because of the geography fish was always on the menu, and seafood was king!

So it was that I discovered my love of Seafood. Beyond my Mother's Puffy Fish ( a story for another day) I grew to love shrimp, scallops, lobster, and fish prepared the old school way. Fried, stuffed or smothered with yummy sauce. Grilling came later and baking was in the game but those were the preparations I learned to love growing up and mostly at Floridian Fish Houses. Now dining at a floridian fish house was somethings special. There were always courses and side dishes to be chosen and the meal normally would start with a amuse of smoked blue fish dip with crackers. Yum!

I rekindled my love of the Florida fish house when I spent years as an actor working down there. Six seasons at Seaside Music Theater in Daytona Beach, Florida taught me to love old school Floridian Seafood Houses again. We would go for the "early bird special" before the show and have a bounteous meal for little money. It was great.

So now in NYC I have craved the Florida Fish House experience and have been so disappointed. I mean Red Lobster is a poor substitution for them and Marysfishcamp.com is really excellent and  comes very close but for the price I have a hard time justifying it.

So I have resorted to doing it at home. Now it's hard to recreate restaurant food at home so I thought about trying to make old school Florida home recipes. So given that I wanted to try something that home cooks might have offered up at the table in the 1960's, that would also have a fish house flavor to it, I sought some retro recipes. One source that I found was in an obscure florida website for the seafood industry that had a collection of older recipes and preparations by fishermen and their wives which were published in the 1960's. the pictures alone were amazing!!  Among these was one for a preparation that struck my fancy and made me interested in trying it. I did and as strange as it sounds and as silly as the ingredients are, it was really really good. It's easy and have an old school flair to it. So I have worked on it and made it my own. So here it is for you to try. I hope you enjoy it.

Baked Festive Fish Filets Florida Style


Ingredients:

6 fresh solid white fish fillets squared off as much as possible by fishmonger ( Cod, Halibut, Mullet)
1 1/2 cups french dressing ( yes aka Wishbone etc.)
1 cup cheezit crackers
1 cup ritz crackers
1/2 cup grated parmesan cheese
paprika
1/2 cup chopped parsley
1/2 cup melted butter

Method:


Run Crackers through a food processor till crumbs add cheese and parsley and mix well in a bowl
Grease a baking dish
Pour dressing into a bowl
Place fish filets into dressing coating liberally with dressing
Then dredge in cracker mixture till well and thickly coated
Place into dish repeat till all filets are done
Sprinkle well with Paprika
Cover dish and place into fridge for 10 mins
Preheat Oven to 500 degrees
Remove from the fridge and pour melted butter over the fish filets
Place into oven and cook for 10 to 12 mins until fish is cooked through and flakey.
Serve with a nice side salad with a creamy blue cheese dressing, and as side dishes for the fish, my green cole slaw and a loaded baked potato with butter, sour cream, green onion and bacon.
Now you are Fish House Fancy! Enjoy Ya'll!


Thursday, February 16, 2012

Tarpon Springs..Going Greek in Florida or Pappas and Potatoes!


Tarpon Springs, Florida. I don't know if you know Tarpon Springs but it is a charming little hamlet just north of Tampa Florida on the gulf coast. Named after Lake Tarpon an inland body of water and settled first in the late 1800's, Tarpon Springs came into the national view after Greek settlers brought the sponge diving industry to the Florida coast. During the 1930's this industry thrived accounting for a major portion of the US sponge production. It was even the subject of a movie " Beneath the 12 Mile Reef" filmed on 1953. However, the film was partially historical at that point. In 1947 a red tide swept through sponge beds practically killing everything in it's path and almost wiping out the sponge industry. A final death blow was dealt it around the same time as synthetic sponges became available and cheaper and drove the natural sponge business out.

Tarpon Springs was and is to this day the largest Greek community in the US. and today has benefited from the residents of the 1950's turning it into a major tourist destination both for the Greek food and the history and tradition of the post sponging industry, and the deep sea fishing industry.

In the late forties savvy Greek fishermen decided to cash in on the one resource they had in abundance, heritage! They recognized that they had culture, food and fishing knowledge that could translate to dollars if marketed correctly.  One such savvy businessman was Michael Louis Pappas, son of Louis Pappas. The Riverside cafe opened in 1925 under the senior Pappas's direction and created what has generally in the USA been accepted and served at Greek restaurants everywhere as "Greek salad". You know lettuce with tomatoes, cucumbers, onions and black olives in a lemon herb oil based dressing. Believe it or not Pappas is actually credited in the Greek community with creating this style of americanized "Greek Salad"  and it is now served nationwide in Greek restaurants and diners everywhere. In 1952 after his father's heart attack the younger Pappas took over running the family business and grew it into a small dining empire. Pappas's restaurant was so famous that at it's peak it boasted 19 cashiers, 30 cooks and 90 servers and is said to have served 4000 people one Easter Sunday. Pappas did a lot to push his town forward but he also did a lot to change the salad created by his father. He added a variety of veggies, improved the dressing making it distinctive and also added a base of potato salad which made it truly a meal in itself. At one point the restaurant sold 1000 of these salads a day on average.

Pappas closed his Riverside Cafe in 2005 and passed away in 2009. It was bought and reopened and remains open today but word has it it has lost the panache of it's original owner.

My Mother's parents moved from Chicago to Tampa in the early 1950's trading in the big city for a smaller town and frigid winters for Floridian sunshine. My grandmother being the adventurous sort she was and not shying away from new experiences or culinary explorations, and my grandfather enjoying the fishing thing, found Tarpon Springs a nice respite and close getaway from Tampa and the everyday. It was there that they first encountered Pappas and the salad he made famous.
Of course the renown of this salad spread to the Tampa area and for the most part in that part of the state if you order a Greek Salad you are going to get one in the style of Pappas.

So as you can imagine this was the version of Greek salad I grew up eating at home. In fact the first time I had one away from home I was disappointed by the lack of ingredients, and flavor. I have been making this salad for years myself now and I enjoy people's reaction to eating it. it's so rich and full and satisfying.  Of course I have made improvements and changes but it's still along the lines of the original. I made it for a group of friends years ago in Charleston and my friend Autumn, who was among that group, asked me to make it again over  this past Christmas,when we had her and her husband over for dinner. She said she just remembers it being so good. And so it is. So for those of you who want to try a twist on the ordinary Greek Salad, here you go. Give it a try it makes a great one dish party meal with some garlic bread and can pretty much be done in advance so can spend more time with your guests.  Enjoy, Ya'll!

Forrest's "Best Ever" Greek Salad (after the Pappas Riverside Cafe Tradition)


Ingredients:

1 large head of Iceberg Lettuce ( or 3 hearts of Romaine trimmed) shredded.
3 cups of Greek potato salad ( recipe follows)
1 red onion diced
1 med cucumber diced into cubes
2 Tomatoes 1 diced and 1 reserved cut into wedges
1 green bell pepper diced
1 can of beets diced
12 small cocktail shrimp cooked and peeled
1 jar Kalamata Olives in juice drained ( reserve juice) from this 1/2 cup diced Kalamata olives reserve rest for garnish
8 radishes slices into discs and reserve 1/2 of the radishes for garnish
4 green onions diced
12 ounces Feta cheese ( 2 crumbled and 2 chopped into squares)
1 8 oz jar greek Salonika peppers drained ( 1/2 chopped the other half reserved as whole
4 anchovy filets diced
1/2 teaspoon pepper
oregano

Greek Potato salad:


6 large yellow potato boiled and cut up
1/2 cup crumbled feta cheese
1 bunch green onions diced
1/2 cup parsley chopped
1/2 cup chopped Kalamata olives
1/4 cup mayo
1/2 cup Greek yogurt
1/4 cup red wine vinegar
1 tablespoon oregano
2 tablespoon minced fresh or jarred garlic
salt and pepper to taste

Method for Potato salad: 

Take all ingredients and combine in a bowl
Mix gently and place in the fridge ( best if made the day before) chill well.

Forrest's Best Ever Greek Salad Dressing 

1 cup olive oil
1/2 cup reserved olive juice/oil
1/4 cup regular Greek yogurt or mayo
1/2 cup red wine vinegar
1/4 cup lemon juice
2 tablespoons garlic powder
1 tablespoon onion powder
4 tablespoons Dried Oregano
2 tablespoons Dijon Mustard
1 teaspoon salt
1 teaspoon black pepper
1/4 teaspoon red pepper flakes

Place everything but olive oil in blender and while running pour oil slowly in from the top till creamy.

Method for Salad:

Get a large serving platter out

Mound the potato salad in the center of the platter

Place all ingredients from salad list except the reserved green onions, whole olives, feta cubes, tomato wedges, radishes and shrimp in a bowl.

In the bowl dress and mix the salad fixings generously till dressed to your liking ( I like it wet but not dripping)

Carefully cover the potato salad with the dressed salad, mounding it till the potato salad is hidden.

Garnish the salad first with the shrimp, then the tomato wedges around, then sprinkle the feta, olives, radishes. Finnish off with the green onions to give some visual punch.

Serve within 10 mins. And watch them ooh and ahh!! When you serve make sure you dig down and get the potato salad underneath. Serve with my garlic bread from another post!! You'll be a rockstar trust me!!!


Monday, February 13, 2012

PLT a Twist on an Old Sandwich Favorite

Necessity is the Mother of invention they say. I would agree and from my experience also a great motivator.

This post today is a simple reminder of that. Yesterday I was at home nursing a cold and I thought that I would just lay around all day and order food in. Well time came for me to eat and I realized that I did not have any cash to pay the delivery guy from my favorite Thai place, which happens to be cash only.

So I looked into the fridge and realized that while I was far from starvation I was not sure what if anything I wanted to eat out of the fridge. Then I saw some left over pork shank and thought that might be good, but the portion was too small. What I thought can I do with other things in there. I did not feel like really cooking ( believe it or not) but I was willing to see what I could put together from leftovers.

Then it struck me, "make a Sandwich"! So as I looked through my options I saw that I had the pork shank  piece. The only bread I had was a package of Martin's potato roll hot dog buns I had rescued from the trash at work. And for veggies, the only greens I had was some ice berg lettuce hanging out in the crisper. I was wishing I had a tomato when it hit me, I did but in the form of a jar of sun dried tomatoes. I also had all the condiments you could want. So I thought alright I will make a sandwich out of all of these and some condiments.

I leapt into action chopping the pork into a chipped pile a pork goodness all sweet and rich from the sticky sauce I had made for it ( see pork osso buco entry for description).  I then shredded the lettuce finely and chopped some pickled jalapenos mixing them together with some mayo and black pepper. I chopped the sun dried tomatoes up and found some red onion which I finely sliced and laid in a bowl. I then poured off a little dill pickle juice on them and let them set up for ten minutes for a quick pickle. I toasted 2 buns and lightly spread them with mayo.

Then to assemble. Bun then the lettuce and jalapeno mixture then the tomatoes then the pork and then as garnish and to add visual interest the lightly pickled red onions on top.

I wish I had taken a picture, because it really looked impressive. It tasted even better all the salty, sweet, spicy. pickled tastes all worked well together. YUM!

So I have a new sandwich. I think that any kind if pork roast leftover would do with a little BBQ sauce but recreating this might take some doing. But regardless, necessity got me to invent a great sandwich for lunch. And that's what is great about cooking, sometimes things happen one time, but at least they happen if you try to do something new. That's the adventure of the kitchen.

Thursday, February 9, 2012

Pork Osso Buco the Roast that dare not speak it's name!

 Osso Buco. It is a dish whose name conjures up the most amazing food visions. Rich meaty bones on a platter laden heavy and smothered in some fabulous sauce. And that meaty goodness sitting on a bed of some starchy, ridiculous, cheesy or buttery laden side dish. It's a winter dish fit for a king, and a very good idea for entertaining. One pot wonder and all.

Osso Buco is an Italian dish generally served one of two ways. It is Veal Shank braised with a brown sauce and served with a gremolata, or in a rich tomato sauce. The first is the older of the two preparations and is traditionally served with saffron risotto. The more modern version is generally served with mashed potato or polenta. Either way it is a 19th century dish which made it's way into the modern Italian kitchen and has stayed there.

I first had Osso Buco when I was in Europe and was treated to a dinner of Osso Bucco by one of the lady's who I was aquainted with through work. She had me and another colleague over for dinner and prepared this as the main course. She was from Tessin in Switzerland, which is the Italian speaking portion of that country. She made this dish in the old style and served it with amazing risotto flavored with mushrooms and herbs. Wow, was that good. Like so many foods I had in Europe for the first time I was amazed that this meat preparation even existed. It was so far from my normal knowledge of the braised meats of my home cookery. Which resided in the camps of the English, German, and Scandinavian camps. But this was awesomely different and special.

Since then I have made traditional and tomato based Osso Buco a few times. But it's an expensive and a time consuming dish. Veal shanks are not the cheapest cut of meat after all and the braising process can take 3 to 4 hours traditionally. So obviously I was wanting to try something a little different. Plus I was cooking for the girls. They were coming over and I had to put a really good feedbag on for them. So I started thinking about lamb. No that too was rather pricey. Then I stumbled on an article while looking around for pork belly recipes that mentioned pork shanks. Cheap and pretty hearty I thought. Oh why not. I am up for a new experience. So lets do them.

So I did a little research and many of the things I read made me recognize that the long braise seemed in my future. I was also unsure of the sauce quality and the flavor profile that the dish might have. I am obsessed with sauce on braised meat. I want it thick and full of flavor. But then I thought. Well, we just did short ribs with an overnight marinade and a 2 hour stove top braise with an amazing sauce. Why not try this with the pork shank. What do you have to lose. I mean if it doesn't cook in the two hours you will just keep cooking it. Not only that but prunes, which are in the marinade go really well with Pork naturally.

So the plan began. I returned to Esposito's Pork Shop espositosausage.com home of some of the finest Pork and Pork products in the city and talked to my guy there. I told him I was interested in getting some Fresh Pork shanks and having them cut and tied like Osso Bucco. I got a package of six large beautiful pieces of Pork Shank for under 15 dollars and headed back to the kitchen.

The process was pretty easy just like the Short Ribs had been. Although, I wasn't sure this time if it would work. I made the marinade, prune juice, teriyaki sauce, and water and placed the pork shank pieces into it until they were submerged. Then clipped the lid of the bucket on and placed it in the fridge. That was it.

In the later afternoon about 4 hours before my party ( because I wanted time to make sure things had cooked correctly) I took the container out of the fridge, poured the liquid into a braising pot threw in 2 star anise pods, brought it to a boil, and then turned down the heat to a simmer bubble thing and returned the meat to the pot and put on the lid. 2 hours later I took off the lid and tested the meat. Fork tender! Unbelievable! I carefully took the meat out of the liquid and removed the star anise I had added as flavor enhancer.  I added 1/2 cup Carolina Gold Mustard based BBQ sauce ( I make and keep this or you can buy it, if I buy it I like Cattleman's BBQ sauce it's my favorite go to red or yellow sauce in a bottle) This was for smoke and edge and 1/4 apple cider vinegar and 1/4  pancake syrup to balance it out. I brought the liquid to a boil and boiled it down, down, down till it was so thick it would have coated and hung onto a spoon like a gravy. It took awhile but when it hits that soiling point it looks like dark caramel in a pot. YUM! I then returned the Pork to the pot and ladled the thick sauce over the meat till it was glistening. I held it until I was ready to serve over very very low heat, then brought it up a little right before serving. I served it over a winter veggie hash that had a vinegar edge and went very well with the sweet smoky sauce, but it could have gone over mashed white or sweet potatoes with lots of butter and garlic or even horseradish. Or a polenta, grits or risotto would have been nice.

It was incredible. Really good. So next time you want to impress your family or your guests try this. Your butcher should be able to help you. You just have to have him cut the shank into 2 pieces and cut the ends off. beforehand. This will give you an ample piece of meat. Enjoy!!

Forrest's Pork Osso Buco with Smoky Sweet Blackened Vinegar Sauce
serves 6


Ingredients

3 pieces of pork shank cut like osso buco and tied up ( get your butcher to do this)
This will give you 6 portions
2 cups prune juice
2 cups low sodium Teriyaki sauce
2 cups water
2 pieces star anise
1/2 cup South Carolina Style Yellow Mustard BBQ sauce
1/4 cup Apple Cider vinegar
1/4 cup Pancake Syrup Maple Flavored

Method 

Mix prune juice Teriyaki sauce and water and place in an airtight container
Submerge Pork in the liquid and let sit in the fridge over night at least 10 hours
Next day take from fridge and pour liquid out and bring to boil in a braising pot on stove.
When boiling reduce heat, return meat to the liquid and simmer on low bubble for 2 hours
Then remove cooked meat carefully and hold.
Remove the Star anise and add the other liquids. Bring to a boil and reduce till very thick and bubbling almost like sugar when it's boiling and it coats a spoon thickly like a gravy. ( if sauce ever gets too thick thin with a little water)
Turn down the heat and return the meat to the sauce. Coat liberally with the sauce and serve warm over your choice of side dish.
Enjoy Ya'll!